
In the art of crafting, cutting mother of pearl is a delicate process that requires patience and high skill. This article will guide you on how to cut mother of pearl carefully and accurately, from selecting the best quality materials to using specialized tools. Through detailed steps, you will learn how to create unique artistic pieces that reflect the shimmering light and natural beauty of mother of pearl. This is not just the process of crafting an item, but also a journey of exploration and expressing your limitless creativity through the language of materials.
Contents
1. Why Cut Mother of Pearl?
Mother of pearl is often cut and shaped for various creative and practical purposes due to its stunning iridescence, durability, and versatility. Whether used in jewelry making, crafting, or DIY projects, cutting mother of pearl allows artisans to transform this natural material into intricate designs and decorative elements.

1.1 Jewelry Making
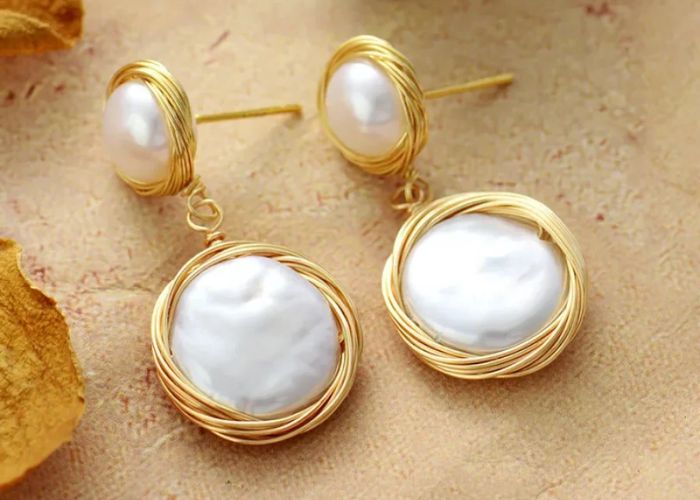
Cutting mother of pearl is essential in jewelry making, as it allows jewelers to craft unique pieces such as pendants, earrings, rings, and bracelets. The material’s reflective sheen adds elegance and depth to jewelry designs. By cutting mother of pearl into different shapes, such as cabochons, inlays, or beads, jewelers can create stunning focal points or accents for their pieces. Its lightweight nature also makes it ideal for comfortable, wearable jewelry, whether in modern or traditional designs.
1.2 Crafting and DIY Projects
Mother of pearl is also widely used in crafting and DIY projects, where it can be cut into various shapes for decorative purposes. Crafters use it to create embellishments for furniture, musical instruments, home decor, and even artwork. Cutting mother of pearl into thin sheets or intricate designs allows for detailed inlays in wooden boxes, picture frames, or mosaic projects, adding a luxurious and artistic touch. To cut mother of pearl, specific tools and materials are required to handle its delicate structure without causing damage. Common tools include:

- Jeweler’s saw: Ideal for making precise cuts and intricate shapes.
- Diamond-tipped blades: Useful for cutting through thicker or harder pieces of mother of pearl.
- Sandpaper or polishing tools: For smoothing the edges and finishing the cut pieces to achieve a polished surface. Additionally, safety equipment like dust masks and goggles are essential, as cutting mother of pearl can produce fine dust that should not be inhaled.
Cutting mother of pearl opens up a world of creative possibilities in both jewelry making and crafting projects. With the right tools and techniques, artisans can unlock the full potential of this luminous material, crafting beautiful and unique items that showcase its natural beauty.
2. Essential Tools
When crafting with mother of pearl, having the right tools is essential to ensure precision and protect the material’s delicate structure. From cutting and shaping to finishing, each tool plays a crucial role in creating fine pieces while ensuring safety during the process.
2.1 Mother of Pearl Saw
A jeweler’s saw or a fine-toothed saw specifically designed for delicate materials like mother of pearl is indispensable. This tool allows for precise cuts, especially when working on intricate designs for jewelry or inlays. The fine blade ensures smooth cuts without chipping the nacre, preserving the natural beauty and iridescence of the material.

2.2 Rotary Tool or Dremel
A rotary tool, such as a Dremel, is a versatile and essential tool for shaping and polishing mother of pearl. Equipped with the right attachments, it can grind, sand, and smooth out rough edges after cutting. Its ability to work on detailed areas makes it ideal for refining the shape and surface of mother of pearl pieces, ensuring they are ready for use in jewelry, home decor, or other crafting projects.
2.3 Cutting Wheels
For tougher, thicker pieces of mother of pearl, cutting wheels attached to a rotary tool or specialized saws can be useful. Diamond-coated cutting wheels are particularly effective for slicing through the material with precision. They help create straight, clean cuts without causing fractures, which is vital for maintaining the integrity of the mother of pearl’s surface.
2.4 Safety Glasses
Safety is paramount when working with mother of pearl, as cutting and grinding the material can release fine dust particles that are harmful if inhaled or come into contact with the eyes. Wearing safety glasses is essential to protect your eyes from dust and debris, ensuring a safe and productive workspace.
Using the right tools – such as a mother of pearl saw, rotary tool, cutting wheels, and safety glasses—is crucial for working with this delicate material. These tools ensure precision, protect the mother of pearl’s beauty, and prioritize safety during crafting.
3. Other Materials
In addition to essential tools like saws and rotary tools, certain supplementary materials and techniques play a vital role in ensuring precision and a smooth finish when working with mother of pearl. Masking tape, sandpaper, and proper cutting techniques help to protect the material and refine the final product.
- Masking Tape: Masking tape is an important material when working with mother of pearl. Applying tape to the surface of the mother of pearl before cutting helps prevent chipping and cracking. The tape acts as a protective layer, reducing the risk of damaging the delicate nacre when sawing or using a rotary tool. It also provides better grip and stability, making it easier to work with intricate designs.
- Sandpaper: Sandpaper is essential for smoothing and polishing the edges of mother of pearl after cutting. Using a variety of grits, starting with a coarser grit and progressing to finer ones, helps to eliminate rough edges and achieve a polished, even surface. Fine-grit sandpaper (typically 400 to 600 grit) is recommended for achieving a smooth, glossy finish that enhances the material’s natural iridescence.
- Cutting Techniques: Proper cutting techniques are crucial to avoid damaging mother of pearl, which can be brittle and prone to chipping. When cutting, it’s important to use slow and steady motions, applying minimal pressure to avoid fractures. Cutting along the grain of the material can also help reduce the risk of splitting. For more detailed work, it’s helpful to use a jeweler’s saw for precision cuts, and ensure that the blade is always sharp to minimize stress on the material.
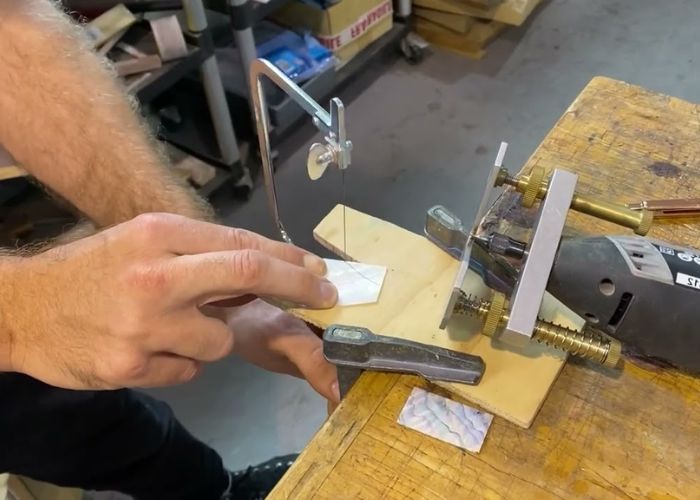
4. Cutting with a Mother of Pearl Saw
Cutting mother of pearl requires precision and care to prevent damage and maintain its beautiful, iridescent surface. A jeweler’s saw or fine-toothed saw is ideal for this delicate work. Below is a step-by-step guide to cutting mother of pearl efficiently and safely.
Step 1: Prepare the Material
Before cutting, clean the mother of pearl to remove any dust or debris. Apply masking tape to the surface to protect it from chipping during the cutting process. Mark the shape or design you intend to cut with a pencil or fine marker for accuracy.
Step 2: Secure the Mother of Pearl
Place the mother of pearl on a flat, stable surface. Use a clamp or vice to secure it in place, ensuring the material is held firmly but gently to avoid cracking. Make sure the marked area you want to cut is fully visible and accessible.
Step 3: Set Up the Jeweler’s Saw
Fit your jeweler’s saw with a fine blade suitable for delicate materials like mother of pearl. The blade should be sharp and securely tightened. A fine-toothed blade ensures smooth cuts without causing stress fractures on the material.
Step 4: Begin Cutting
Start cutting slowly and carefully along the marked lines. Use gentle, steady pressure, allowing the saw to do the work without forcing it. Move the saw in smooth, fluid strokes to prevent jagged edges or cracks. If the design is intricate, make small, controlled cuts, adjusting the angle of the saw as needed.
Step 5: Finish the Cut
Once the shape has been fully cut, gently remove the masking tape and inspect the edges for any rough spots or imperfections. Use sandpaper or a rotary tool with a fine attachment to smooth out the edges, ensuring a polished finish.
Step 6: Clean the Piece
After cutting, clean the mother of pearl piece with a soft, damp cloth to remove any dust or residue. This will enhance its natural sheen and ensure it’s ready for further crafting, whether for jewelry, inlay work, or other decorative projects.
Cutting mother of pearl with a saw requires patience and attention to detail. By following these steps—preparing the material, securing it properly, using the right saw, and finishing the cut with care—you can create precise, beautiful pieces that showcase the elegance of this natural material.
5. Using a Rotary Tool
A rotary tool, such as a Dremel, is invaluable when working with mother of pearl, offering versatility for cutting, shaping, and polishing this delicate material. To achieve the best results while minimizing the risk of damage, here are some essential tips and tricks.
- Choose the Right Attachment: Selecting the appropriate attachment is crucial for effective work. For cutting, use diamond-coated cutting wheels that can handle the hardness of mother of pearl without causing chips. For sanding and polishing, fine-grit sanding drums and polishing bits are ideal for achieving a smooth finish.
- Use Low Speed: To prevent overheating and cracking, set your rotary tool to a low speed. This reduces the risk of generating excess heat, which can damage the material. Take your time and allow the tool to work without forcing it through the material.
- Keep the Material Cool: To further protect mother of pearl, occasionally cool the material by dipping it in water or using a damp cloth while you work. This helps maintain its integrity and prevents overheating.
- Work Slowly and Steadily: When using a rotary tool, patience is key. Move in slow, controlled motions to avoid sudden movements that could lead to uneven cuts or stress fractures. This approach also allows for more precision in detailed work.
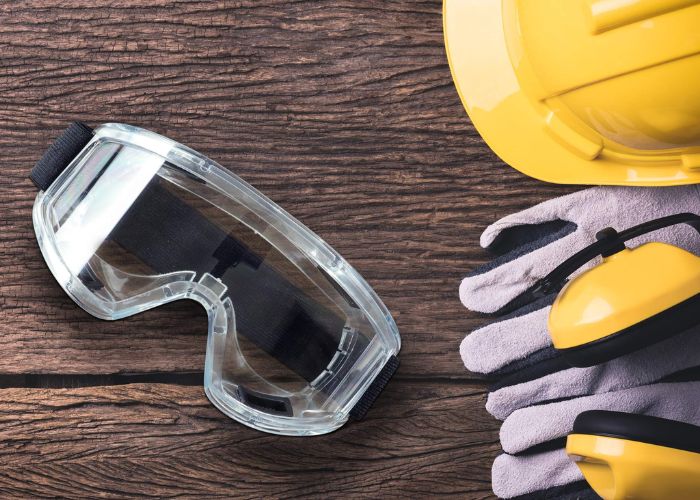
- Protect Yourself: Always wear safety glasses and a dust mask when using a rotary tool. This protects your eyes from flying debris and helps prevent inhalation of fine dust particles, ensuring a safe working environment.
- Practice on Scrap Pieces: Before working on your final project, practice on scrap pieces of mother of pearl to refine your technique. This helps you get comfortable with the tool’s power and control, making you more confident when cutting or shaping your main pieces.
6. Safety Precautions
When working with the mother of pearl, it’s important to follow safety precautions to protect both yourself and your workspace. Personal protection, such as wearing safety glasses to shield your eyes from dust and flying particles, is crucial. A dust mask or respirator is necessary to prevent inhaling harmful mother of pearl dust, while gloves help protect your hands from sharp tools.
Ensure your workspace is well-ventilated to allow dust to disperse, and use a stable, cushioned surface to avoid cracks or damage to the material. Regularly clean your workspace, using a dust collection system to keep the area clear of harmful particles, and maintain sharp, well-maintained tools to reduce the risk of accidents. After completing your project, wipe the mother of pearl clean with a damp cloth to enhance its luster, and inspect the piece for any rough edges, smoothing them out with fine sandpaper if needed.
7. Sanding and Polishing
Sanding and polishing are essential steps in working with mother of pearl to ensure smooth, refined edges and a brilliant, shiny surface. These processes not only enhance the material’s aesthetic appeal but also help to preserve its delicate structure.
- Smoothing Edges: After cutting mother of pearl, the edges can be rough or uneven. To achieve a polished look, begin by using coarse-grit sandpaper (around 220 grit) to gently smooth the edges. Sand slowly and in even strokes, being careful not to apply too much pressure, as mother of pearl is delicate and can chip easily. Once the edges are uniformly smooth, gradually switch to finer grits (up to 600 or 800 grit) to refine the surface. This step will help eliminate any imperfections and prepare the piece for polishing.
- Achieving a Shiny Finish: To bring out the natural luster of mother of pearl, polishing is key. After sanding, use an ultra-fine grit sandpaper or polishing cloth to gently buff the surface. For an even shinier finish, apply a polishing compound or paste and use a soft rotary tool attachment or a clean cloth to buff the material in circular motions. This process enhances the reflective qualities of mother of pearl, revealing its iridescent sheen. Be sure to clean the piece with a damp cloth afterward to remove any dust or residue, and allow it to dry completely to maintain its shine.
8. Cleaning and Care
To preserve the natural beauty and iridescence of mother of pearl, regular cleaning and proper care are essential. Since mother of pearl is delicate and prone to damage from harsh chemicals or abrasives, it’s important to handle it gently.

Use a soft, damp cloth to wipe away dust or fingerprints. Avoid using harsh cleaners, bleach, or alcohol, as these can damage the surface and dull its shine. For a deeper clean, use mild soap mixed with water, and gently wipe the surface. After cleaning, dry the piece with a soft cloth to avoid water stains or damage to the finish.
Keep it away from prolonged exposure to direct sunlight or extreme temperatures, as these can cause discoloration or cracking. When storing, place mother of pearl items in a soft pouch or padded box to prevent scratches. Regular gentle polishing with a soft cloth will help maintain its lustrous finish.
9. FAQs
9.1 Can I cut mother of pearl with a regular saw?
Cutting mother of pearl with a regular saw is not recommended. Regular saws, especially those with coarse teeth, can cause chipping and cracking due to the material’s delicate nature. Instead, it’s best to use a jeweler’s saw or a fine-toothed saw specifically designed for delicate materials. These tools provide greater control and allow for smoother, more precise cuts, minimizing the risk of damage to the mother of pearl.
9.2 What is the best way to prevent mother of pearl from cracking during cutting?
To prevent mother of pearl from cracking during cutting, use a fine-toothed jeweler’s saw or a diamond-coated rotary tool. Cut slowly with gentle pressure, and keep the speed low to minimize heat. Periodically cool the material with water or a damp cloth, and apply masking tape over the cutting area to reduce chipping.
9.3 Is mother of pearl easily scratched?
Yes, mother of pearl can be easily scratched due to its delicate surface. It’s important to handle it with care and avoid contact with harder materials. To protect it, store mother of pearl items in soft pouches or padded cases and clean them gently with a soft cloth.
If you have any further questions, don’t hesitate to send thanhcongcraft an email us at [email protected] or message us at WhatsApp: +84967485411. Hope to serve you soon! Best regard!
