Creating pine cone place card holders is a delightful and easy DIY project that adds a touch of natural elegance to any event. These charming holders are perfect for holiday gatherings, rustic weddings, or casual dinner parties, bringing a bit of the outdoors to your table setting. Not only are they cost-effective and eco-friendly, but they also offer a unique, personalized touch that your guests will love.
Follow along to learn how to make pine cone place card holders, a simple way to bring warmth and intimacy to any event.
1. How to make pine cone place card holders?
Creating pine cone place card holders is a simple and charming DIY project. Here’s a step-by-step guide to help you make them:
Materials Needed:
- Pine cones (clean and dry);
- Place cards (or small pieces of cardstock);
- Optional: paint, glitter, ribbons, or other decorative elements;
- Hot glue gun and glue sticks (optional);
- Scissors.
Instructions:
Step 1: Collect and prepare pine cones
Gather pine cones from your yard or purchase them from a craft store. Clean the pine cones by shaking off any dirt or bugs. You can also bake them in a low-temperature oven (200°F) for about 30 minutes to ensure they are dry and free of pests.
Step 2: Decorate pine cones
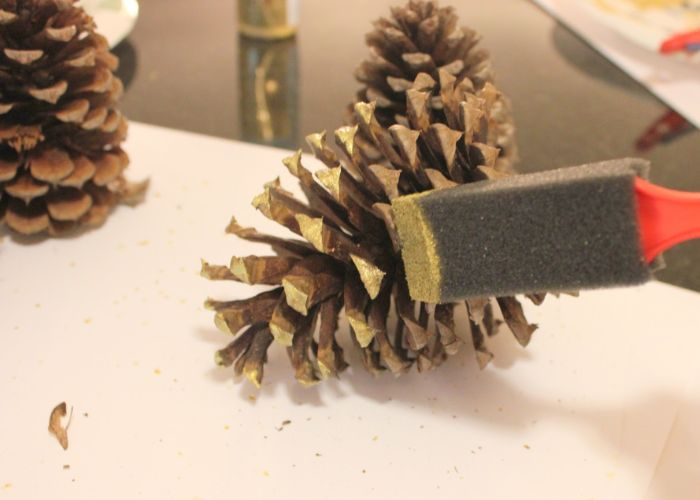
You can spray paint the pine cones or use a brush to paint them. Allow the paint to dry completely. Add glitter by applying a thin layer of glue and sprinkling glitter over it. Let it dry.
Tie a small ribbon around the top of the pine cone for an extra decorative touch.

Step 3: Create the slot for the place card
Carefully inspect the pine cone to find a natural gap between the scales where you can insert the place card. If the gap isn’t wide enough, use scissors to gently widen the space. Be careful not to break the pine cone.

Step 4: Prepare the place cards
Write or print the names of your guests on the place cards. You can use pre-made place cards or cut small pieces of cardstock to your desired size.
Decorate the place cards if you wish, by adding borders, designs, or embellishments.
Step 5: Assemble the place card holders
Insert the place card into the gap in the pine cone. Adjust the angle so that the card stands upright and is easily readable.
If the place card is not staying securely, you can use a dab of hot glue at the base of the card to keep it in place.

Step 6: Display your pinecone place card holders
Arrange the pine cone place card holders on your dining table. They add a rustic and festive touch to your table setting.
2. FAQs
2.1 Can I use other materials besides cardstock for the place cards?
Certainly! When it comes to creating place cards for your pine cone holders, you have a range of materials to choose from beyond cardstock. Consider using kraft paper for a rustic touch, handmade paper for texture, or fabric for a soft and tactile feel.
Wooden tags add an earthy vibe, while chalkboard or acrylic options offer versatility and modernity. Get creative and select a material that complements your event’s theme and style, ensuring a personalized and charming touch to your table setting.
2.2 How can I personalize these place cards?
There are several ways to customize these place cards to suit your event and your guests’ preferences. Hand-lettering each guest’s name adds an elegant and personal feel, while adding embellishments like stickers or charms can reflect the theme of your event.
You can also customize the colors of the cards to match your decor or include personalized messages or quotes to make your guests feel welcome. For a truly unique touch, consider attaching small photos of each guest or incorporating seasonal elements into the design.
2.3 Can I use these place card holders year-round?
You can definitely use these pine cone place card holders year-round! While they may be particularly fitting for autumn or winter events due to their natural and rustic aesthetic, pine cone place card holders can also be versatile enough to complement various occasions throughout the year.
For example, you can incorporate them into spring or summer gatherings by pairing them with floral arrangements or pastel-colored decor. Additionally, they can add a cozy and charming touch to dinner parties, weddings, or any special celebration regardless of the season.
2.4 Are there alternative materials I can use for the base?
Certainly! Consider using small branches or twigs for a natural and rustic look, or opt for wooden blocks for a sturdy and timeless base. Clay or polymer clay can be molded into custom shapes, while cork slices offer a lightweight and eco-friendly option. Fabric-covered bases add a soft and decorative touch, perfect for enhancing your table decor.
With these alternative materials, you can create unique and personalized pine cone place card holders that complement any occasion or theme throughout the year.
3. Conclusion
Making a DIY pine cone place card holders is a delightful way to add a personal and rustic touch to any table setting. This straightforward DIY project allows you to get creative with simple materials, transforming ordinary pine cones into charming decor pieces.
Enjoy the satisfaction of making something beautiful and functional with your own hands!
For any questions, don’t hesitate to send thanhcongcraft an email us at [email protected] or message us at WhatsApp: +84967485411. Hope to serve you soon! Best regard!


